
Introduction
Chatbots are everywhere, but not all are created equal. Some can handle general questions, but struggle with specific or up-to-date information. That’s where a Retrieval-Augmented Generation (RAG) chatbot stands out. It uses AI grounded in data in a knowledge base to give accurate answers without needing constant updates or retraining.
This great helps with returning relevant, timely information and reducing the bane of Generative AI models - hallucations. There a many potential use cases, but to name a few, a RAG chatbot could be used to explain company policies, walk staff through processes, or answer technical questions—fast and accurately based on the right documents.
In this post, we will go through the first steps to build a RAG chatbot using Microsoft Azure AI Foundry - uploading data and setting up an API allowing access to the model grounded in data.
Requirements:
- Microsoft Azure Account
- Data to train the RAG
- Basic Knowledge of Generative AI concepts
Types of Chatbots
Before diving into the methodology, let’s start by discussing the different ways that LLM’s can be used for a chatbot. Chatbots come in different types based on how they process and retrieve information. A regular chatbot relies on pre-trained AI models and provides general responses but sometimes lacks in depth information in specific topics.
A fine-tuned chatbot is trained on specialized data, making it more accurate for a particular industry or use case, but it remains limited to what it has learned. It also needs to be retrained in its entirety if internal, specialised information needs to be updated.
A RAG (Retrieval-Augmented Generation) chatbot goes a step further by retrieving real-time information from external sources, ensuring more up-to-date and fact-based responses without constant retraining. The best choice depends on whether you need general answers, specialized knowledge, or real-time information.
Demo Use Case
In this example, we will be building a custom RAG chatbot to allow users to interact with documents from the publicly available Simcoe County Housing Policies. This is a collection of publicly available PDF documents, but for someone with specific questions about policy (such as a county resident) would be a lot of information to troll through. Where to begin? This is the sort of situation for which a RAG-enabled chatbot is designed!
Introduction: Creating a RAG Chatbot
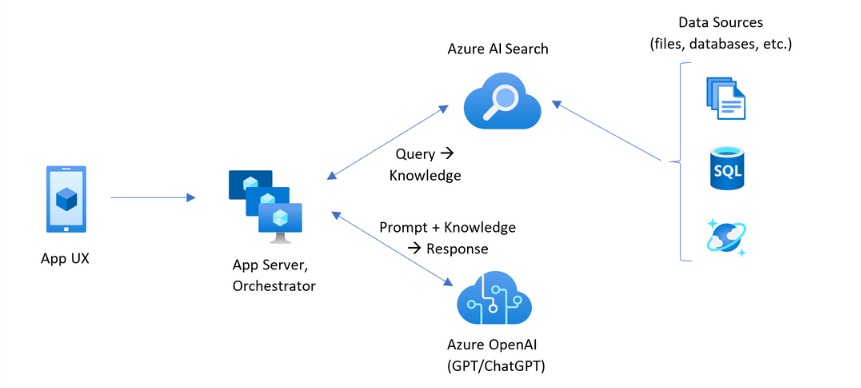
In this post, we’ll walk through the methodology of creating a RAG chatbot, using Azure AI Foundry. The process involves creating several different resources which will be combined later to make the chatbot. The workflow is visualised below:

Here is the workflow:
- Create an Azure Blob Storage instance (prerequisite).
- Create a Blob Storage container (prerequisite).
- Add company data to the container (prerequisite).
- Create an Azure AI Hub.
- Create an AI project.
- Create a model.
- Add context and company data by linking the storage container.
- Get the API details to use the model in a web app.
1. Create Azure Blob Storage Account
To begin setting up your custom RAG chatbot on Microsoft Azure, prerequisite steps will be undertaken first to create an Azure Blob Storage instance. This involves navigating to the Azure Portal and searching for Azure Storage Accounts. Once located, you need to select the appropriate subscription, resource group, region, and name for your storage account. Azure will automatically create any additional resources required for the storage account to function, such as a key vault and the storage account itself. These resources are essential for securely storing and managing your data.
Steps:
a. Navigate to Azure Portal: Go to Azure Portal and log in with your credentials.
b. Search for Storage Accounts: Use the search bar to find Storage Accounts.

c. Create Blob Storage Account: Select the subscription, resource group, name, region and primary service for the storage account.

d. Save the Access Key: Navigate to the “Security + networking” dropdown on the left tab and select “Access keys”. Under “key1” Show and copy the Key. This will be used in step 6.

2. Create Blob Storage Container
After setting up the Blob Storage instance, the next step is to create a container within this storage account. This container will hold the data which needs to be indexed through for the RAG. You can create a new container by navigating to the Blob Storage account and selecting the option to add a container. Once the container is created, you can upload the relevant indexing data into it. This data will be used by the chatbot to provide accurate and relevant responses.
Steps:
a. Navigate to Blob Storage Account: Go to the Blob Storage account you created.
b. Create Container: Select “Containers” (under ‘Data Storage’) and click “Add Container”. Give the container a name and click “Create”

c. Upload Data: Upload your company data to the container.

3. Create Azure AI Hub
Now that the prerequisites are completed, the next step is to create an Azure AI Hub. This hub serves as the central point for managing your AI resources. To create the AI Hub, you need to select the subscription, resource group, region, and name for the hub. Azure will automatically create additional resources required for the hub to function. During this process, a new storage account and key vault will be created automatically. You should configure the networking to public and set the identity to “credential-based access”. Once all the configurations are set, click “Create” to deploy the hub. This deployment will include the necessary internal resources, such as storage and compute, required for the hub to operate effectively.
Steps:
a. Navigate to Azure AI Foundry: From the Azure Portal, search for Azure AI Foundry.

b. Create AI Hub.

c. Configure Resources: Select the subscription, resource group, region, and name for the hub. Azure will create additional resources like storage accounts for metadata and key vaults.

d. Set Networking and Identity: Configure networking to public and identity to credential-based access.
e. Deploy Hub: Click “Create” to deploy the hub.

4. Create AI Project
Once the AI Hub is deployed, you can proceed to create an AI project within it. To do this, access the hub from your homepage and select “Launch Azure AI Foundry”. This will take you to the AI Foundry page, where you can create a new project. Name the project (e.g., Foundry_Chatbot) and proceed to the overview page. The project overview page provides a comprehensive view of the project’s status and resources, enabling you to manage and monitor the project’s progress effectively.
Steps:
a. Launch Azure AI Foundry: Access the hub from your homepage and select “Launch Azure AI Foundry”.

b. Create New Project: Click “Create Project” and enter the project name (e.g. Company-Foundry-Chatbot) with the appropriate hub created earlier.

c. Overview Page: Navigate to the overview page to view the project’s status and resources.

5. Deploy Base Model
With the AI project created, the next step is to deploy a base model that can use Retrieval-Augmented Generation (RAG) for learning the resources that will be used by the model. This involves setting up the back-end base model type within the project. The base model serves as the foundation for the chatbot’s learning capabilities, allowing it to retrieve and generate relevant responses based on the data provided.
Steps:
a. The model can be accessed right after creating it or from the main page, by going to the AI Foundry page, and selecting the project. In the Overview section you can view all the resources created/connected for the project.

b. In the tab on the left, under “My Assets”, select “Models + Endpoints”. Select the “Deploy Model” and “Deploy Base Model”.

c. Select the appropriate model and confirm.

d. It’s important to read the different “Deployment Types” and “Tokens per Minute Rate Limit” and select the appropriate one based on the use case. These can affect the cost and availability of service for the chatbot.

6. Link Container to Model and Create Vector Index
Once the model is deployed it can be opened in playground to start making changes to it. Model instructions can be provided under the “Setup” section to choose the tone and content of responses, for example for making a use-case or industry specific assistant. The data for RAG can then be added to the model under “Add your data” section. This is added by linking the Blob Storage container to the model. The data was already loaded in the container during the prerequisite (step 3). This connection allows the model to access the data stored in the container, enabling it to provide accurate and contextually relevant responses.
Steps:
a. Once the model is deployed, navigate to it by going to the project and selecting “Models + Endpoints” under “My Assets”. Choose the base model that is created.

b. Select “Open in playground” to access the base model. This opens the base model that can be manipulated to set up prefernces and add data.

c. The “Give the model instructions and context” section can be edited to provide the basic context (the system prompt) for the model. This can include the type of conversational tone used by the model or refrain it from discussing any topics.

d. To create and train the RAG, new data needs to be added to the model which the model can ground itself against. Under “Add your data” dropdown, select “Add a new data source”.

e. Select the Data Source as Azure Blob Storage.

f. Select “Create a new connection to an Azure Blob Storage resource” in “Blob store”.

g. Add the details: Add the Subscription ID, Storage account (created in step 1), Blob container (Created in step 2), Authentication method (Credential based), Authentication type (Account Key), Account Key (the key copied in step 1d), Connection name (create a name). Select Create Connection.

h. Select the newly created connection for the “Blob store” and the data files. Select “Next”.

i. Select “Create a new AI Search” under “Select Azure AI Search Service”. Select the appropriate Subscription, to location and the appropriate pricing tier based on the amount of data for RAG training.

j. Select the appropriate Subscription, Resource Group, Location and Pricing Tier. This could be based on the amount of RAG training data and frequency for training. Select Review and create > Create

k. Select the newly created search service: Under “Select Azure AI Search Service” select “Connect other Azure AI Search Resource” and “Add connection” for the newly created service.

l. Select the newly added service under “Select Azure AI Search service” and click Next.

m. Select Create Vector Index.

n. Data Ingestion and Modeling: Wait for the data ingestion and modeling process to complete.

o. Navigate to the created model within the Project. Select “Models + endpoints” and select the appropriate model.

p. Copy the Endpoint key on the right panel.

This endpoint can now be used to access the RAG chatbot directly, either via API requests or programmatically, for example, through the openai library in python.
Conclusion
Setting up a custom RAG chatbot on Microsoft Azure using Azure AI Foundry involves many steps, from creating a Blob Storage instance to deploying a base model and configuring API access. However, as we saw in this tutorial, creating an API for a chatbot with Azure AI Foundry is nonethless a straightforward process to set up correctly to provide accurate, contextually relevant responses based on your company’s data. It’s advised to regularly check the billing in the coming weeks after setting up any services to keep an eye on expenses for the services.
Please feel free to get in touch if there are any questions regarding the above workflow or services provided by PRAKTIKAI - we’d be happy to chat about helping you set up a similar generative-AI backed assistant for your organization.